
Vimeo Video Page – instructor guide
Vimeo Video page is a full integration of Moodle system with your Vimeo account. After installing the plugin and integrating your Vimeo account, your Moodle system will generate a new folder in Vimeo for every course you open with your Moodle system.
The plugin will generate a Video page for every course and uploading video file to Vimeo you will be able to see it immediately in your Moodle video page.
This guide will show you how to open a new Vimeo account, create an App and install and integrate your new Vimeo for Moodle plugin.
How to create a Vimeo account:
For opening a new Vimeo free account click on this link: Vimeo free account.
Vimeo free account gives its users 5GB for free. If you need more then that you can subscribe to Vimeo plans in the following link: Vimeo plans.
For our plugin you do not need to have the paid account and can work with the free one as well.
After subscribing you will need to verify your by clicking on the verification button inside the e-mail that you recived from Vimeo.
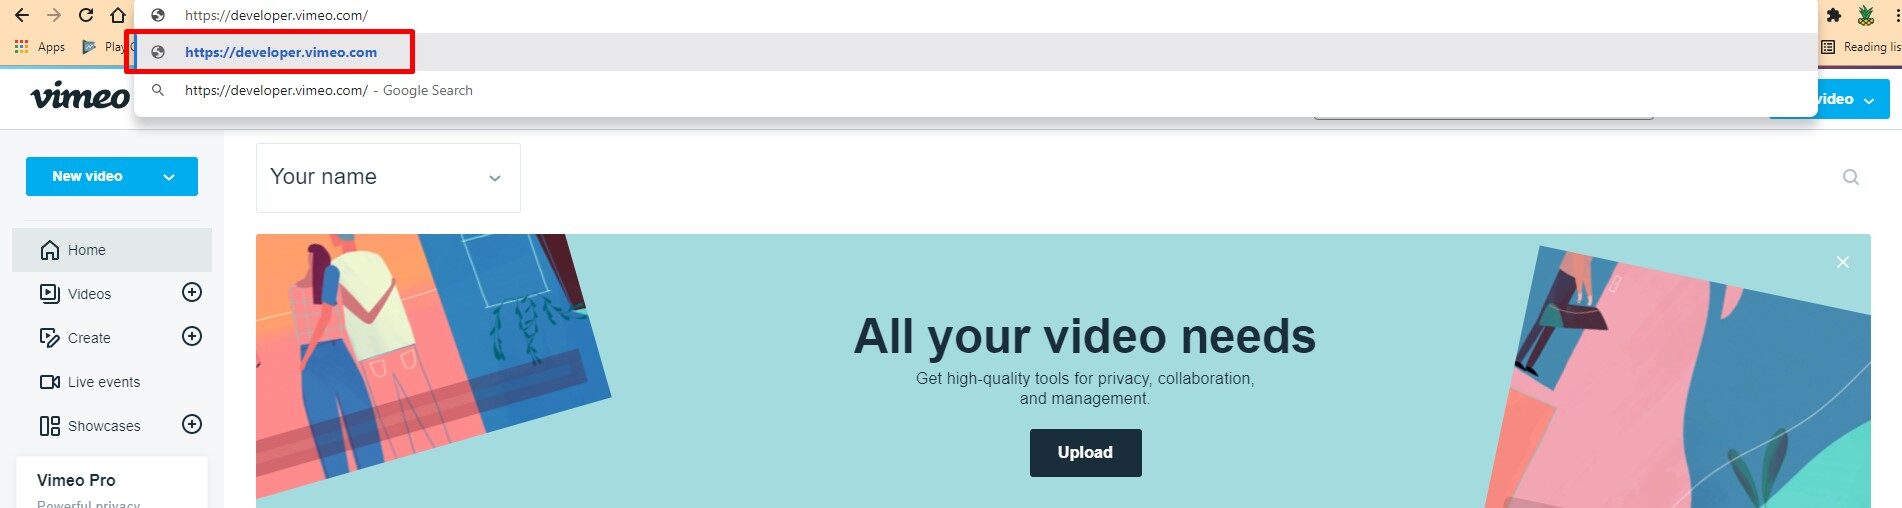
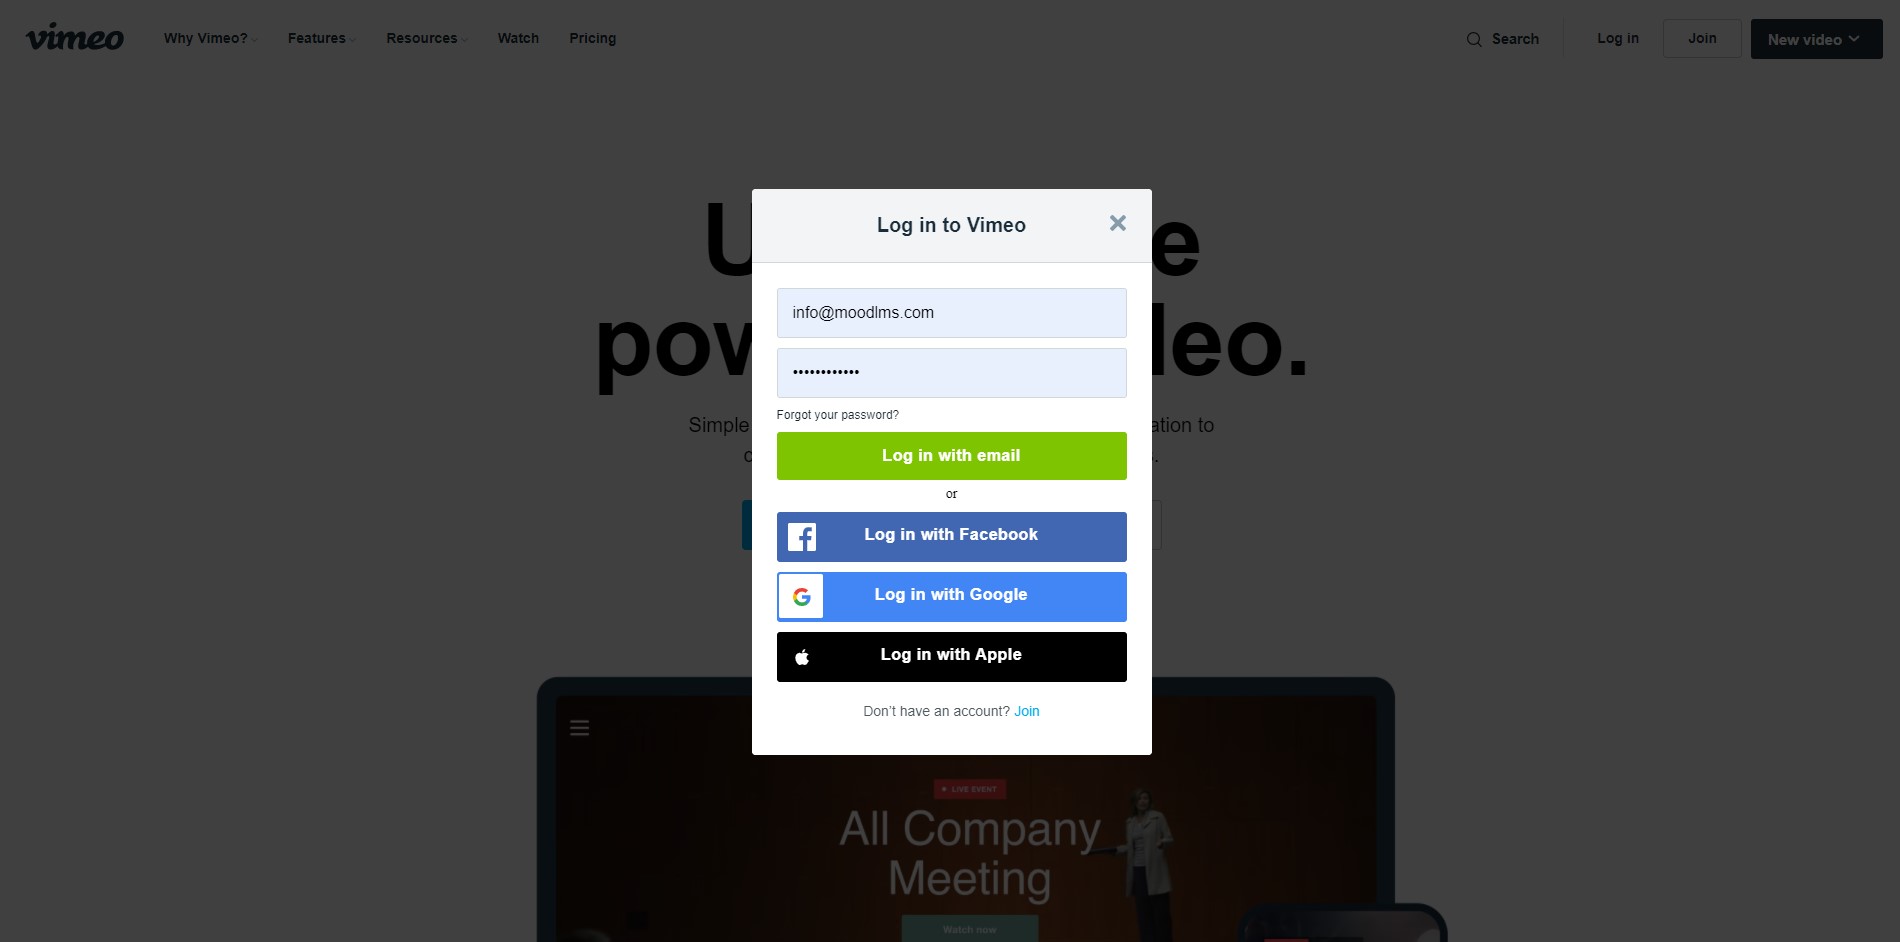
After login copy this address and paste it in your browser address bar or just click on the following link: https://developer.vimeo.com/
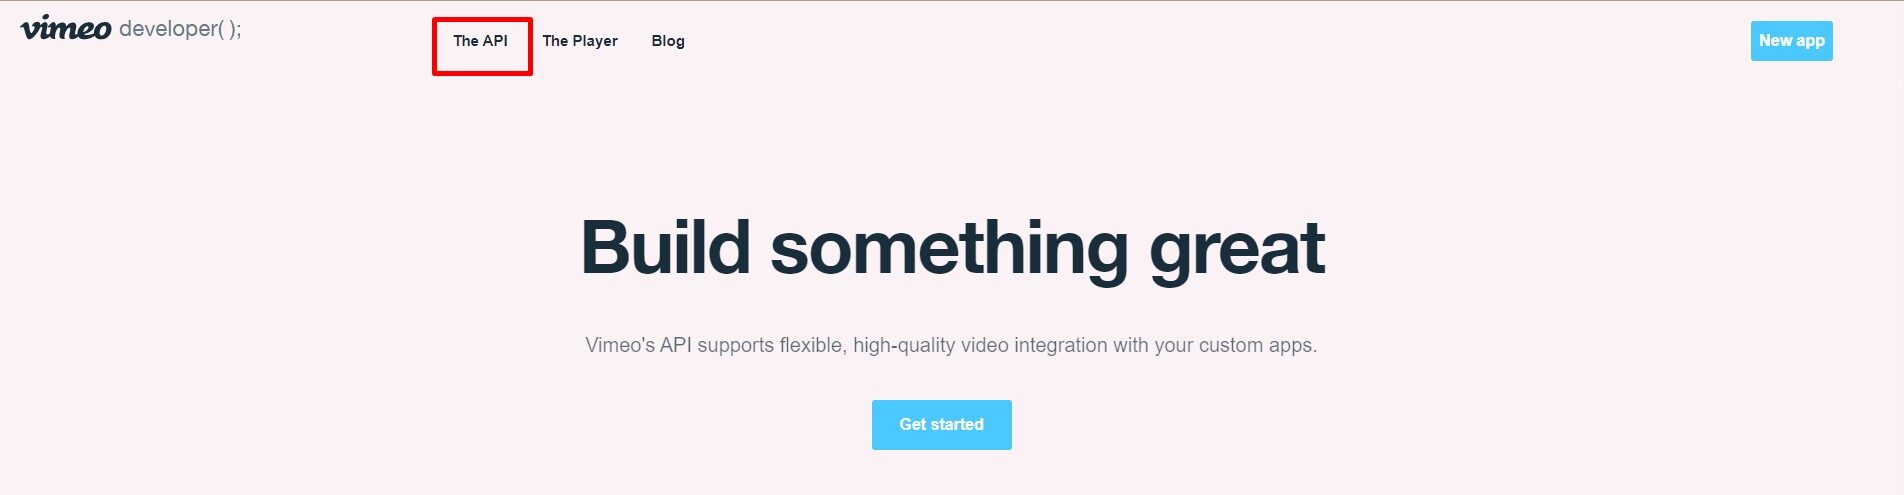
At the top of the screen you will see a link “THE API”. Click on it.

On the top screen right corner – click on “CREATE AN APP” button
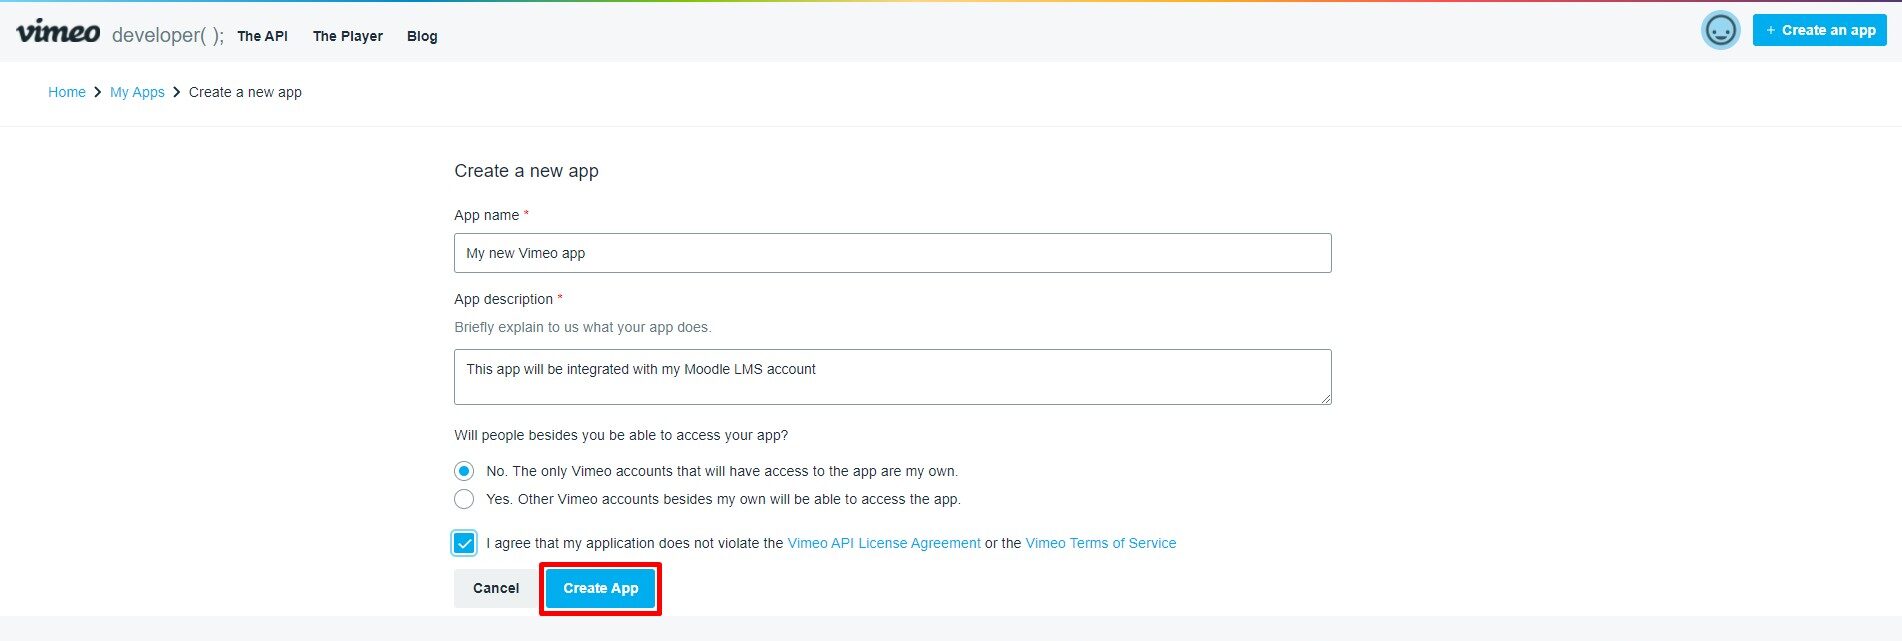
Create a name for your app and have some description. Checkbox the terms of use and click on “CREATE AN APP” button
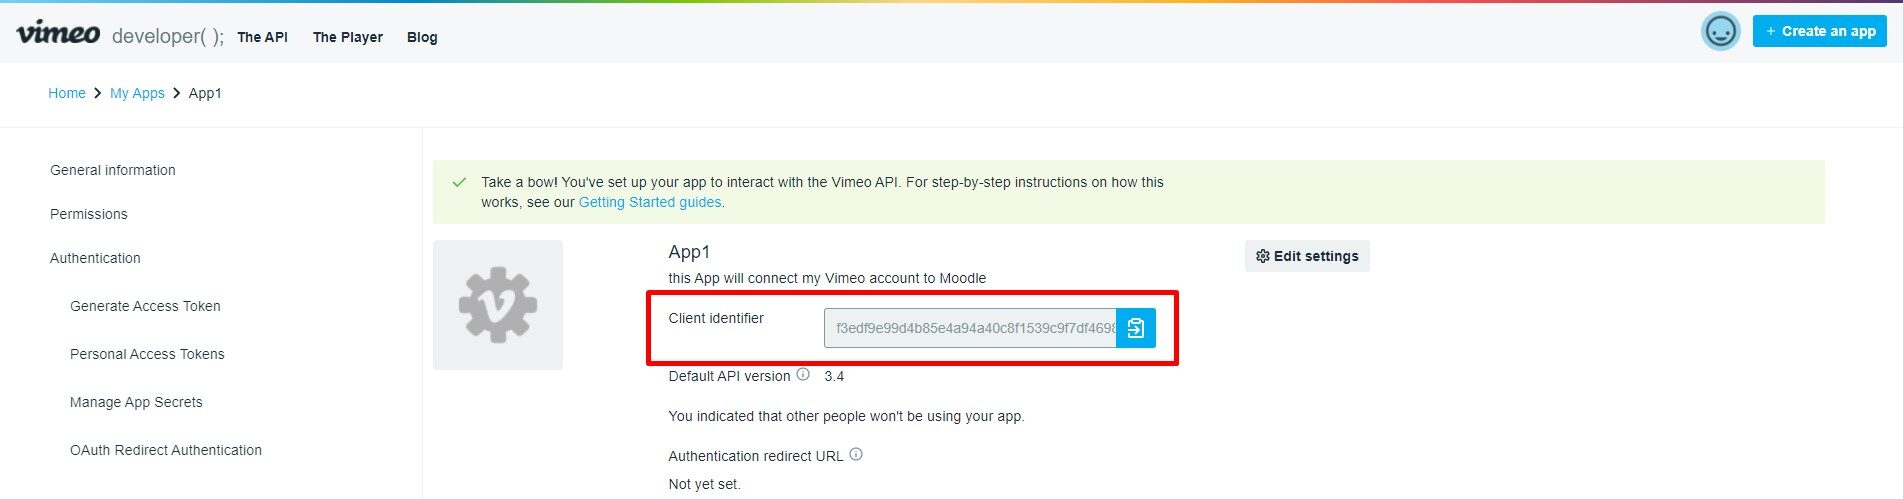
Copy client identifier.
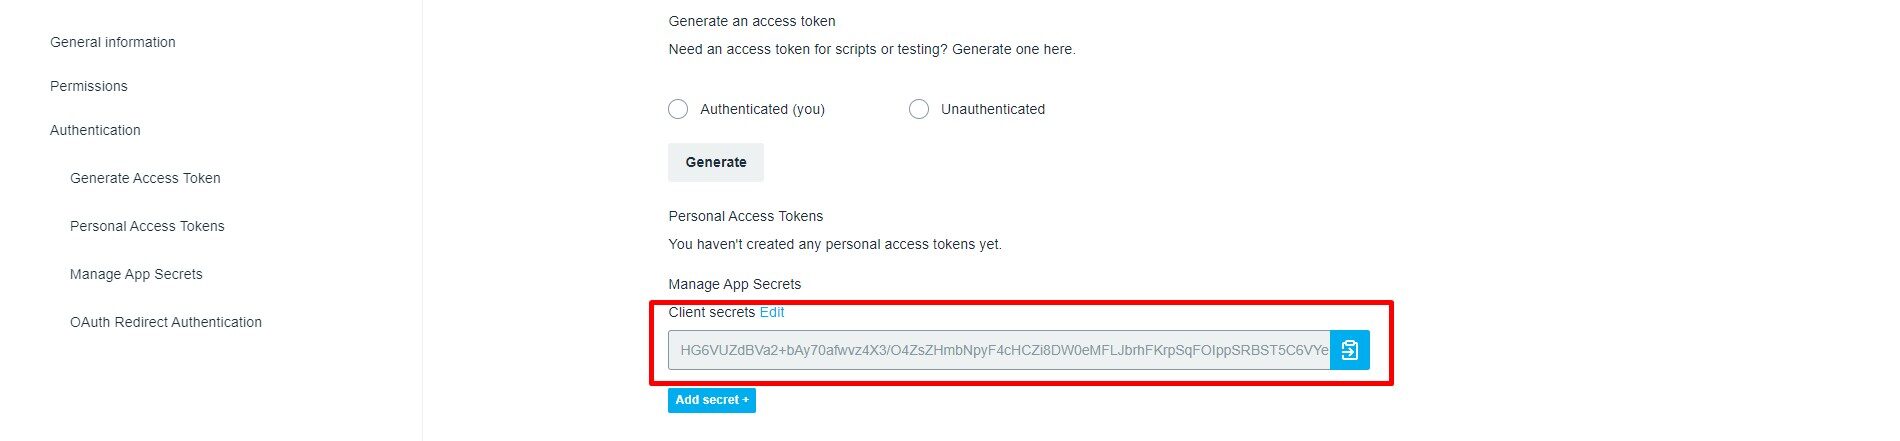
Copy Client secrets codes.
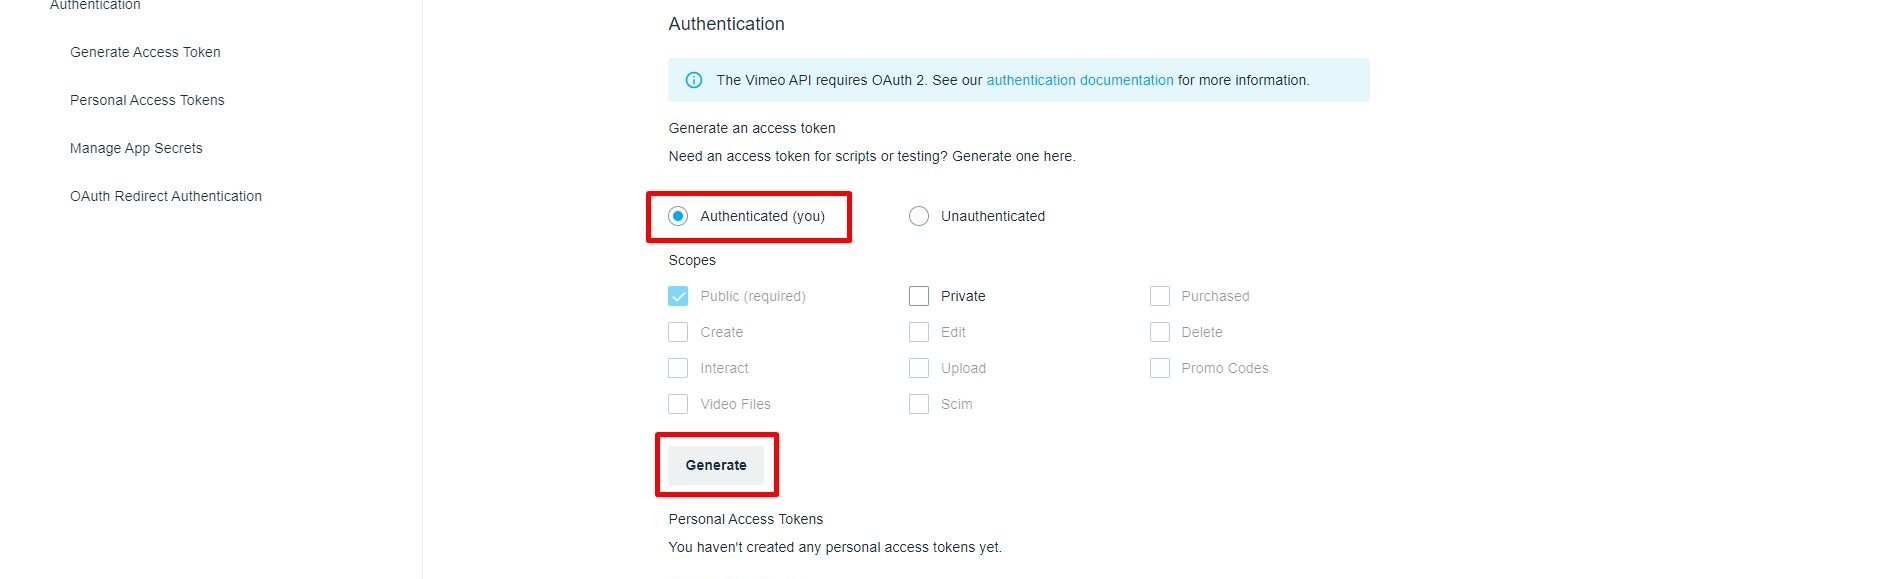
Now you need to generate the Vimeo App. Click on the “GENERATE” button.
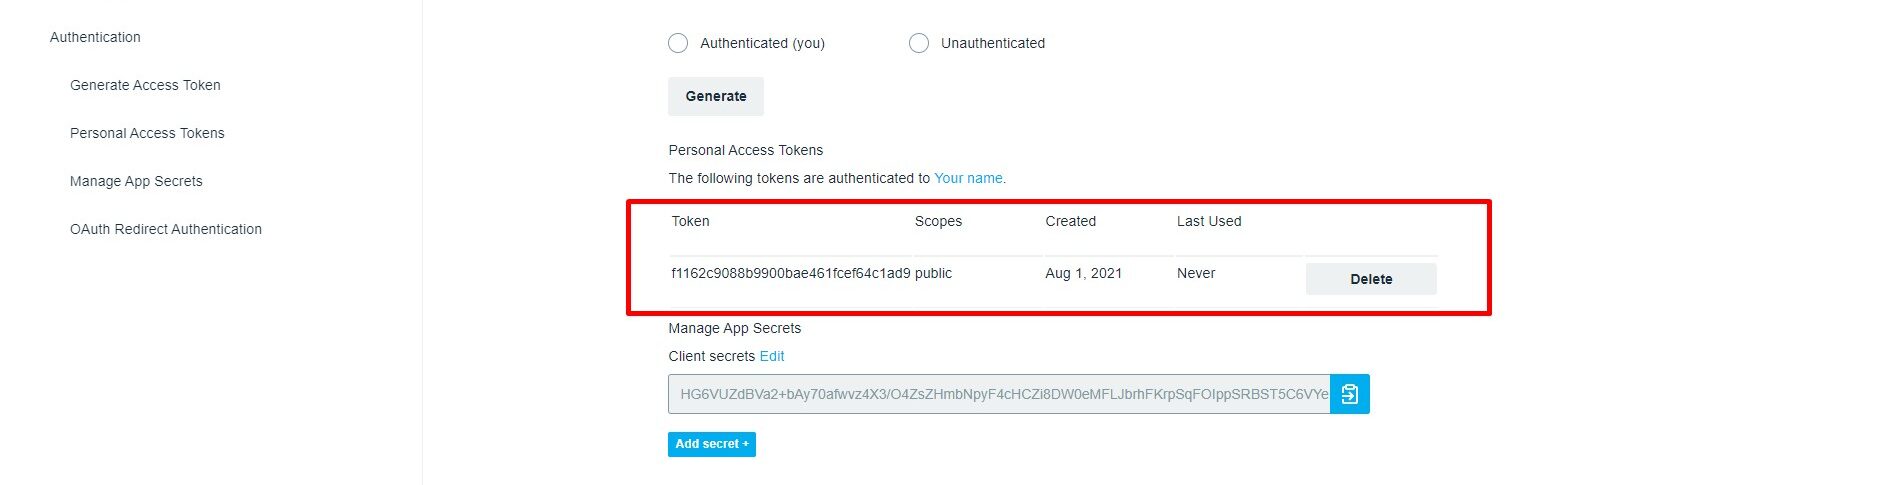
Copy the Tokan access code.
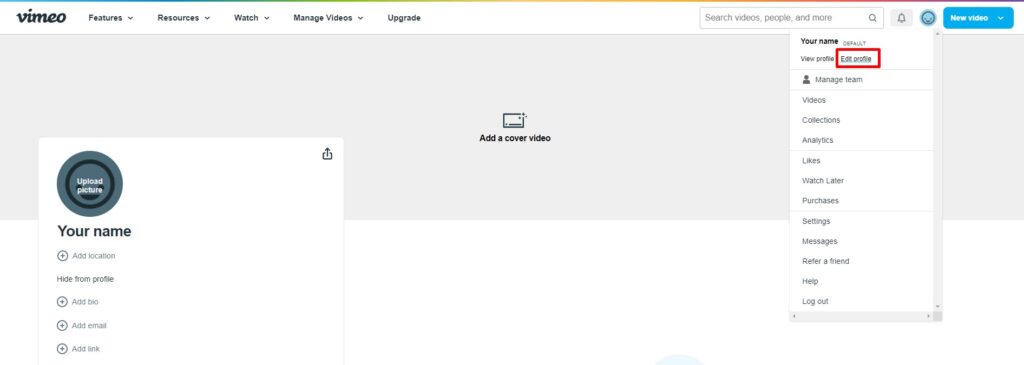
Login back to your Vimeo account and click on your profile image. Enter the edit profile link. Note: If you are still in the developer url you need to logout and log back in to the Vimeo.com account.
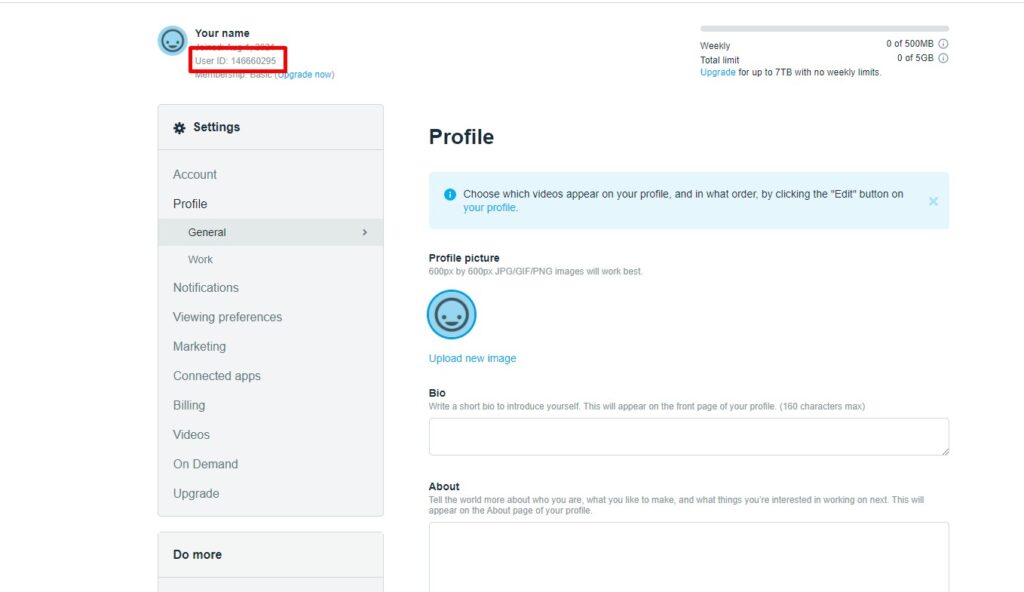
In edit profile you will find your client ID number. You need to copy it as well.
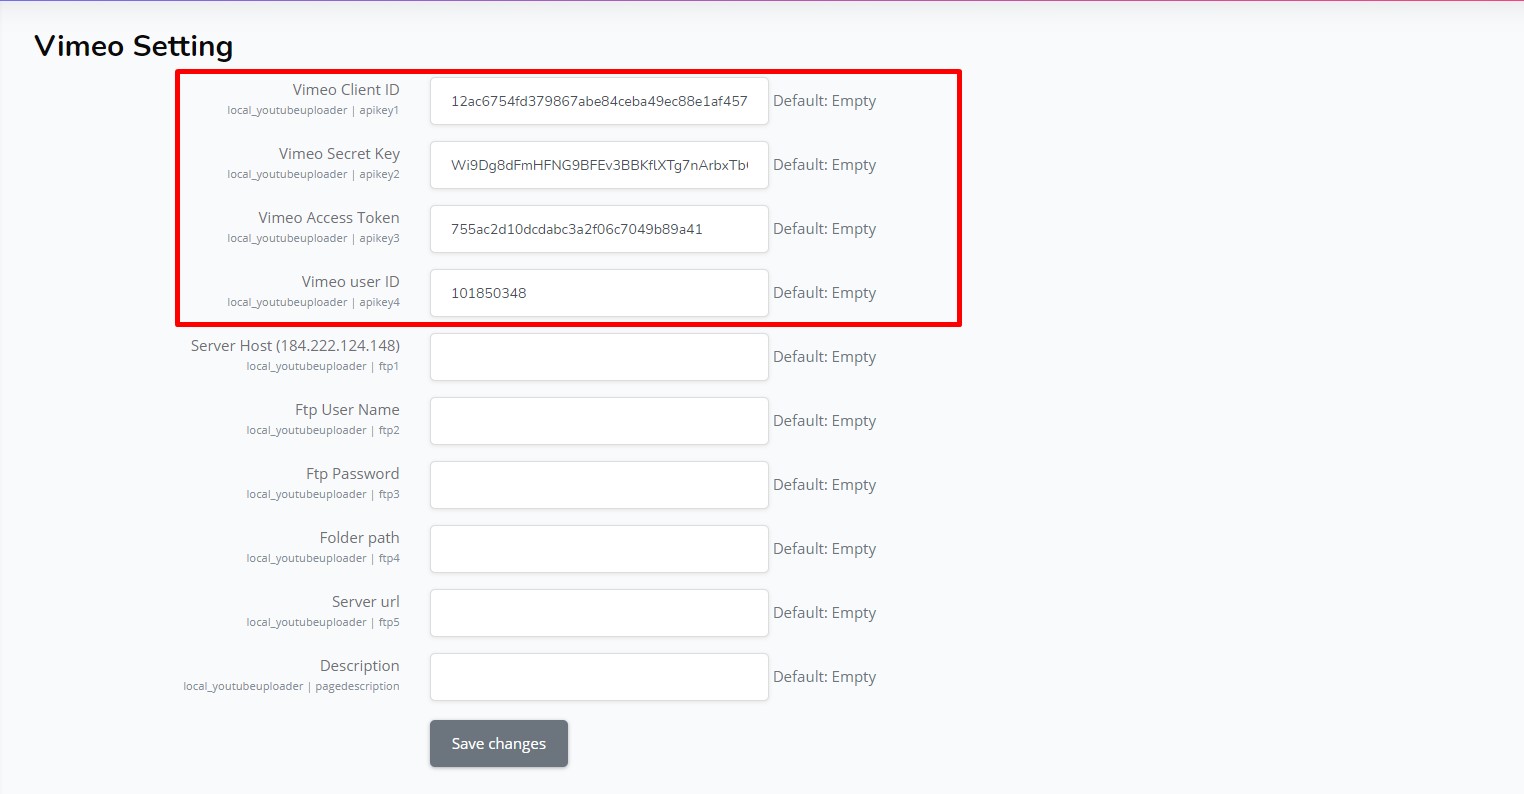
Insert your Vimeo App information to the plugin settings page.
- Vimeo client ID in the plugin = to Client identifier in Vimeo
- Vimeo Secret Key in the plugin = to Client secrets in Vimeo
- Vimeo Access Token in the plugin = to Personal Access Token in Vimeo
- Vimeo user ID in the plugin = to User ID in the edit profile Vimeo account.
Congratulations!! You are ready now to start using the Vimeo Video page!!
After setting the Vimeo app you can check out our how to use the plugin guide – check this blog
WhatsApp for Moodle Plugin – Settings
WhatsApp for Moodle plugin gives the Moodle teachers and students the option to communicate on WhatsApp using WhatsApp API platform.
Our plugin has two types of accounts:
Basic account teacher account gives the teachers the options to:
A. To communicate with students using WhatsApp
B. To create & manage courses WhatsApp groups.
C. To handle WhatsApp communication from multiple devices simultaneously.
Many more WhatsApp options!!
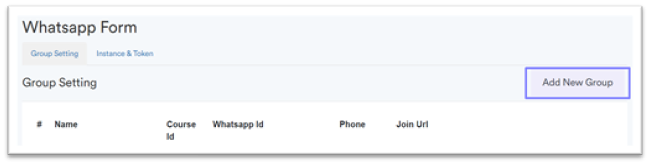
How to create and manage groups:
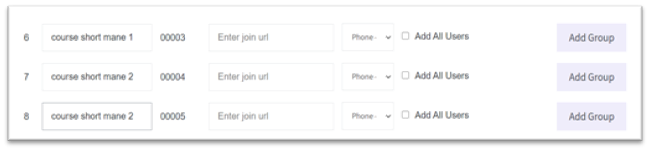
In the WhatsApp settings page > group settings tab. In this tab you will find all your course list. In the group settings you have the following options:
Set the group name – The defult group name is the course short name.
note: you can manage the group users in the main front system at any time.
Add a join url – If you like to connect existing group to the WhatsApp system – insert the group join url and the existing group will be added to your system. If you leave this filed with no join url then the system will open a new group for the course.
Choose a phone account – If you have multiple accounts, Choose the account that will manage the course group.
Add all users – By selecting the checkbox all course users will be added to the group. If you do not check the box then group will be open only with the system phone.

After filling the requirements click on add a group. Group will get an ID and if this is a new group it will provied a join link url
Once adding the group, you can edit the group name and managing phone
How to add a new group that is not related to any course
Click on open a new group button
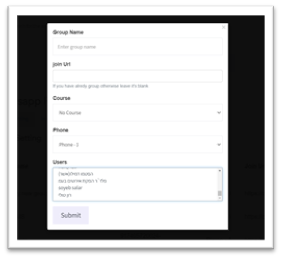
You will be directed to the add group popup where you will need to add the needed information, choose the students, and submit
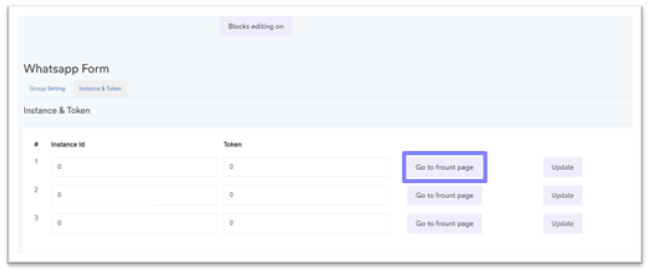
To log into the front panel: Go to site administration > Plugins > WhatsApp for Moodle settings > Instance and Token > go to front page

Scan the QR code on your phone just like in WhatsApp web. You will be directed to the front WhatsApp for Moodle front page
Congratulations!! You are ready now to start using the system and communicate with your students!!
If you like to see how to have installation guide for the plugin to your needs – check this blog